Hi, I'm Torrey. Welcome to Left Field, where creativity runs amok and imagination is ALWAYS more important than knowledge. Shoes are not allowed but ties are optional. This is a repository of snippets from my life out here in Left Field. One never knows what shiny bits of creativity will be found here... cards, scrapbook layouts, photography, poetry, recipes, ponderings, rantings and musings. It could be anything! Life in Left Field is always changing, always real, always ...interesting.

June 30, 2012

Spotlight on li'l old ME

Well shut my mouth and call me for dinner...I'm the "spotlight" artist over at 

Here's an excerpt from my FASCINATING interview...

5. Do you follow any special "design rules"?

Rules? RULES? We don’t need no stinkin’ rules!!!! I’m the “Rebel Scrapper Without a Cause”. I scoff at rules. I laugh at rules—that maniacal laugh that sends chills down the spine…MWA Ha Ha Ha Ha.

Oh wait, maybe there is ONE rule…Never mind, I was just kidding.

Oh wait...I do tend to do the "rule of 3" thing a lot. But it's not a "RULE" it's more a "tendency".
******************************************

Wanna see more? Then hurry scurry on over to the Bombshell Stamps Blog and prepare to be...enlightened. Everything you EVER wanted to know about yours truly awaits you! Don't dilly-dally...get a move on!

(this offer ends soon and is not valid in combination with any other offer/coupon/discount)


June 27, 2012

3 Cheers For Summer!

Hidy ho! It's the last Wednesday of the month (already???) so that means it's time for 
Blog Hoppening.
 Oooh, I like that word. I just made it up--Hoppening. It rates right up there with other fatabulous words like flopportunity and ginormous.

I digress (so what else is new).

The theme of this month's Hoppening is "3 Cheers for Summer". This means you gotta make something with a summery feel AND you gotta use 3 of something on your project--like 3 different patterned papers, 3 tags, 3 eyelets, 3 colors...3 whatever!!!  3, 3, 3 -- Triad, triplet, tres, triplicate, trois, THREE!!! This Hoppening is brought to you by the number 3 and the letter "S" for summer. I bet you're all humming the Sesame Street theme now, aren't you?
If you hopped on over from Sweet Susie's nifty neat-o blog, then you're in the right place! Kudos to you! If not, no worries, you still got here! If you missed the other stops on this fun, fun, fun and summery hop, you can start from the beginning at the Bombshell Stamps blog.

For my project I incorporated many sets of "3"...
  • 3 Bombshell Angels
  • 3 parasols
  • 3 pairs of sunglasses
  • 3 words in the sentiment
  • groups of 3 brads. Wait...I only put on 2 groups of 3 brads. Dang. Well... 2 x 3 = 6 and 6 is divisible by 3--so it all works...just don't look at the errant group of 2 brads on the sentiment.
  • and there are 333 white dots on the background paper. (you're counting them aren't you?)
I stamped all the images directly on ONE piece of white cardstock (I'm not as stamp-challenged as I thought). Then I colored the images and their sunny background with my Prismacolor pencils. It was nerve-racking. One false move, and I would have had to go to plan B and cut them all out separately...but today I had coloring skillz. I did color the right parasol separately and silhouette-cut it out so I could pop it over the angel on the right. If this weren't bright enough already, I decided to add glitter. So there is glitter on here...lots of it. It's on the sentiment, sunglasses, shoes, bathing suits, right parasol and on the sun background.

Enough incessant babbleage. Here's my card.

I'd like to enter this card in the following challenges:

Ingredients:
Pin-up stamp - Bombshell Stamps (Bombshell Angel)
parasol digital stamp - Bombshell Stamps (Peek-A-Boo Geisha)
sunglasses - my own design
Prismacolor colored pencils
patterned paper
glitter pen - Sakura
mini brads - Creative Impressions

Thank you for hopping by! Please be sure to sprinkle LoVe along the way in the form of comments. Finally, it's on to your last Hop-Stop. Our illustrious, and industrious DT captain is waiting for you!

So, onward to Kathi's fantabuloso blog!!

THIS JUST IN....We just had one more hippity hopster just join us!!! Miss Kelli!!! So be sure to hop over to see Kelli's entry too!

Here's a complete list of the Hopsters, in case you get lost or would like to revisit one or all.

Mary 
that's me >>   Torrey  << that's me!


June 24, 2012

Down the Rabbit Hole


It was one of THOSE dreams. Not the kind where Johnny Depp is your cabana boy and brings you drinks with little umbrellas. Nooooooooo. It was the kind of dream from which you wake up--bolt upright, exhausted, crabby and bathed in sweat and frustration.

I dreamt I was a waitress.


A waitress in what surely must be... Hell (or right next door to Hell).

I should have known from the exterior of the restaurant I was working in that it was not gonna be a GOOD waitress dream. The café was in an old converted brick house. It was circa 1900, 3 stories tall with a peaked roof and wrap-around front porch. Quaint? Not so much. The outer wall had a HUGE, gaping crack that extended from the foundation to the attic. The front porch was sagging and listing to the left. Most of the exterior paint had peeled off. What was left made the place look as though it were an eternal state of...molt--like it had once had a bad sunburn and was peeling, for all eternity.

I should have known then, what was in store for me INSIDE this dream.

Inside was a cozy, hodge-podge arrangement of miscellany tables and unmatched chairs that very much reminded me of what the Madhatter's tea party would look like. The walls were covered in a faded, red Baroque  wall paper  that would have been better suited for the parlor of a Victorian brothel. Many of the tables were coffee table height and several of the chairs were bar stool height. And wouldn’t you know it…the bar stool chairs were surrounding the coffee tables. And guess what? When customers came in…what tables did they choose to sit at?

Normal ones?

Of course not. Not in this dream.

In this dream the patrons chose the Alice-In-Wonderland mismatched bar stool/coffee table combos; despite the fact that all the “normal” ones were empty. Then, they started complaining about how hard it was to reach their silverware.

This was just the beginning.

I relocated the first party to a “normal” table. And realizing I hadn’t given them menus, went to fetch a couple…only to find that someone had poured honey all over them. Well, I couldn’t very well give them a menu that only Pooh Bear would love, so I decided I’d just tell them what we had to offer. But, the thing is…I had no clue WHAT we had to offer.

By then, 3 more parties had come in and were seated at (you guessed it) the “weird” tables.

*sigh*

So, in an effort to tell the first patrons what we had to offer, I ran back to the kitchen only to find it empty. No cook, no bottle washer. Nobody. Instead, there was a full buffet set up with a decent number of selections. (okay, this dream is looking better).

I went back into the main dining area (where I knew 4 parties now resided) but somehow that number had doubled—like bacteria in a petri dish…and all 8 parties were seated and all of them were staring at me. I smiled and went to the original patrons’ table and told them we had a beautiful buffet for lunch. That seemed to appease them but then one customer said “Where’s my water?”…which set in motion a domino effect of customers all asking for water. So, I started running around filling water glasses…which were all DIRTY (of course). Not only were the glasses dirty…the water in the pitcher looked like it had come from an all-but-dried-up African watering hole. It was brownish green with little floaty bits. If that isn't bad enough, the tables were now FILTHY and needed busing and wiping. Every table was a disgusting mess piled with dirty dishes and covered with soaking wet paper napkins and who-knows-what.

This is when it gets bad.

The original diners, having checked out the buffet, decided there was nothing they wanted from the buffet and they were now demanding menus…the menus that were coated in honey.

Table # 2, which originally had 3 people seated at it, now had 7 people sitting there. Of course they didn’t have any drinks yet (though they did have clean silverware—hooray for small victories). Then they all started firing questions at me. Questions to which I didn’t know the answers. I tried to write them down so I wouldn’t forget…but all I could find to write on were paper napkins. Wet paper napkins…and a pen that (oddly enough) wouldn’t write on wet paper products.

“I want Grape soda…do you have Grape soda?”

“I want pork roast…is there pork roast on the buffet?”

“What’s for dessert?”

“Where is the restroom?”

Ensuring them I’d find out the answers, I excused myself and literally made a mad dash to the back to glean information.

Grape Soda, NO. But there was Dr Pepper, Orange, Pepsi and ...um...imported mineral water from Africa.

Pork roast, YES. At least the GIANT lump of meat on the buffet table sorta looked like maybe it COULD be pork roast.

Dessert? There was what looked like chocolate pudding—but it was on the steam table nestled between the mashed potatoes and green beans...and it was HOT…and there were emancipated green beans floating in it...and there were little puddles of what was probably gravy for the pudding's mashed potato neighbor…so I wouldn’t recommend the dessert.

Ladies’ room in back…but, of course, there was no toilet paper.

***
At this point everyone was seated at dirty tables and nobody had drinks or menus. It was then that one “helpful” customer decided it was the perfect time to give me tips (and not the monetary kind). She had frizzy red hair, garish makeup with peacock blue eyeshadow, fake eyelashes and bright coral blush that made her TOTALLY look like a circus clown. She was also sporting 2-inch long fire-engine-red nails that were filed to dagger-like points, so I decided to stifle my urge to hum the dee-dee-deedle-deedle-dee circus music theme.

She started out her vituperation (oooh good word) with a cheesy smile as she picked up a sopping-wet napkin using her thumb and forefinger like pincers.

Her whiny, nasal voice reverberated throughout the dining room--bouncing off the tiled tin ceiling in an annoying echo. “Honey, let me offer you some FRIENDLY advice”, she said in a sarcastically saccharine tone with an emphasis on the word “friendly".

“You should…Blah blah blah BLAH blah BLAH blah blah”.

That’s what she said in my dream…”Blah blah blah BLAH blah”. It was reminiscent of the way adults sound in all the Peanuts cartoons. Now how am I supposed to understand that?

This is when people started getting perturbed and got up to leave. I called out to them, "… WAIT,  it's my first day as a waitress, please be patient." But, I was met with a slamming front door.

Why was I the only person working in this restaurant?? Where were all the other employees? What was with the coffee tables? Where was Johnny Depp with my drink?? Oh, never mind...there he is.


*sigh*

This is the point in the dream when I realized it WAS, in fact, a DREAM. If it were real, Johnny would have put a PURPLE umbrella in my drink. So, I decided “To heck with this!” and woke up—bolt upright, exhausted, bathed in sweat and frustration.

I think I'm feeling a LITTLE stressed about all my upcoming DT projects mixed with my web design responsibilities for my husband's and my business. But you know what "they" say..."Best way to eat an elephant is one bite at a time".

THAT'S IT!! THAT'S WHAT THE MYSTERY MEAT ON THE DREAM BUFFET WAS....ELEPHANT.

One thing I know for certain...I'm going to be a LOT nicer to wait staff from now on.


June 23, 2012

Arts and Crafts at the Labora-Torrey

Many of you have heard the term "Camp Grandma" as it refers to kids going to their grandmother's house and getting to do all sorts of fun and crafty things. But, I am SO not a grandma. And, my studio is NOT a camp--it's a Labora-Torrey.

I do, however, have nephews...and one of them is spending the summer with us (his name is Neal).  But the question arises...what fun projects does one do with a 20-year old Goth/Anime-styled young man? I mean, braided friendship bracelets out of embroidery floss and God's Eyes made of yarn and sticks are just not fashionable anymore (though I still like them).

So, while I was mindlessly browsing "stuff" on Pinterest, I ran across a tutorial on transforming a plain-Jane T-shirt into something...cool. It involves cutting various holes into a T-shirt to form patterns or images. I thought this just might be something my very artistic and highly-stylized nephew, Neal, might like. So off we went to the thrift store in search of a T-shirt. Since Neal is a crazy-talented artist, I handed him a piece of paper and a pencil and said, "Go for it".

His design is inspired by a character from a video game. The character is "Blot" from Epic Mickey. Blot is the villain. It's this big, black shadowy-looking dude with an eery, drippy smile.

Blot


Neal and his "Blot" T-shirt

Neal designed and cut out the image on a red T-shirt. I carefully hand-stitched around all the holes to help preserve its integrity so it can actually be worn...and washed. He's wearing it over a black T-shirt. I think it's WAY cool.

Here is another example of the same technique. I love this one too...maybe I'll attempt something similar down the road...but more holes = more hand-stitching. Ugh.


June 22, 2012

Colored Pencil Tutorial-o-rama


Hidy Ho crafty cats and chicks! Torrey here with another TuTorrey-al for y’all. Today I’m offering up a little tooty tut on “Coloring with Prismacolor Pencils-101” which can also be found on the Bombshell Stamps Blog. Not that I have anything against Copics…but I figured it would be a nice change to see another type of coloring medium featured!  Besides, as y’all know, I’m Copicphobic.  I do, however… love, Love, LOVE my Prismas…and so will you, once you bite the coloring bullet and learn how to use them! 

Today we're gonna be coloring up the FaBuLoUs wench from Bombshell Stamps . She's part of the "A Pirate's Life" set. Here is what she's gonna look like when we're done! Doesn't she look AWESOME? Wow, she kinda looks like that iconic picture of Raquel Welch in "One Million Years, B.C." doesn't she? (that dates me, huh?) Do you realize that Raquel is over 70 now? And she still looks fabulous.

Here is a list of what you’ll need:
  1. Stamp of choice
  2. Stamping ink (I recommend Memento as it doesn’t smear)
  3. Odorless mineral spirits—aka OMS (a MUST!!—get it at Walmart or the hardware store in the paint department. It’s a LOT cheaper than buying it at an art supply store where they sell it as “brush cleaner”)
  4. Colored pencils (I choose Prismacolor, but just about ANY colored pencil will work—even the cheapies)
  5. A good pencil sharpener.
  6. A micro/fine tip black marker.
  7. emery board or sandpaper (to clean/sharpen the blending stubs)
  8. old toothbrush (to clean the emery board)
  9. paper blending stubs (the “solid” type…not the “rolled paper” ones) also called "Tortillons".
  10. cardstock (today I’m using Kraft colored)
  11.  (not shown) Eraser


And now a few tips and facts about the wonderful world of colored pencils.

  • When using colored pencils…for small, detailed images (like this one) work from Light to Dark. For larger, bolder images…work from Dark to Light.
  • Work on a smooth surface to achieve smooth colors—otherwise, it’s like doing a rubbing and you’ll pick up the texture/pattern of whatever is under your paper (which could be cool).
  • Use odorless mineral spirits (OMS) and a stub to blend and smooth out the color. Most colored pencils have a wax-based lead and OMS basically dissolves the colored “lead”.
  • ALWAYS clean off the blending stub on an emery board BEFORE switching to a new color, otherwise your colors will get polluted.
  • Colored pencils work GREAT on Kraft cardstock (as you’ll see in a minute)
  • Know how to PROPERLY sharpen your pencils to reduce lead breakage. Here’s a great video on how to do it…it really DOES make a difference.  http://www.youtube.com/watch?v=Qf-4a4vZYtE
  • They’re FAR less expensive than markers…and they don’t dry out.
  • They’re smaller too, and thus easier to store.
Okay, on with the show.

To color this image (the way I did) you’ll need the following Prismacolor colors: order is lightest to darkest

Skin:
   PC 927 – Light Peach
   PC 929 – Rose
   PC 1080 – Beige Sienna
   PC 943– Burnt Ochre
   PC 945– Sienna Brown
   PC 946 – Dark Brown

Dress:
   PC 929 – Rose
   PC 925 – Crimson Lake
   PC 937 – Tuscan Red
   PC 946 – Dark Brown
  
Belt, lace, earrings and boots:
   PC 938 – White   
   PC 917 – Sunburst Yellow
   PC 943 – Burnt Ochre
   PC 935 – Black

Hair:
   PC 943 – Burnt Ochre
   PC 937 – Tuscan Red

             Step One: Skin Base
  • I always color skin first…then the rest of the image after. That way I’m less likely to botch the skin by dragging surrounding color into it when blending.
  • Lay down a layer of Light Peach on ALL skin surfaces (this will become the highlights). Don’t worry about covering up detail lines in the face or hands…we’ll fill those in later.
  • It doesn’t have to be perfect…just good coverage over all the skin.
  • If you go outside the line, no worries…just erase it BEFORE you use the OMS.

Step Two: Blending
  • Start with a clean stub. If it’s been used, just run it across an emery board until it’s clean. You can also “sharpen” them on the emery board.
  • Saturate the tip of a clean stub with OMS. I store my OMS in an empty dauber-top paint bottle. You can just cut a small piece of sponge and put it in the bottom of a little container/jar and pour some OMS on it to serve as your reservoir--then just dab your stub on the saturated sponge.
  • Rub the colored area in a small, circular motion to blend it smooth.
  • Run your stub over the emery board every once in awhile to remove built-up wax.
  • Reapply OMS to stub as needed.
  • If skin looks blotchy, just add more colored pencil and re-blend until you get desired look.


Step Three: Adding Skin Shadows
  • Starting with your next darker shade (Beige Sienna) outline all skin areas and desired shadow areas (as shown on the leg on the right).
  • Blend it out with a stub and OMS.
  • Then, take the next darker shade (Burnt Ochre) and outline skin areas again.
  • Blend this out with a stub and OMS.
  • Repeat this process first with the Sienna Brown and finally with the Dark Brown (as shown on the leg on the left)…blending after each color…and slightly pulling the color toward the middle of each area.
  • NOTE: make sure you leave SOME of the skin areas in the middle of each section with just the light peach undercolor for highlight.
  • Use care when coloring the face. Add shadows by the nose and around chin  with the Burnt Ochre only
  • Add blush with the Rose pencil and blend.

Step Four: Coloring the red dress
  •  Start by coloring the whole thing Rose. Really…trust me.


  • Outline dress and shadow areas with Crimson Lake.
  • (Bottom image) Blend with stub and OMS. 
  • Using Tuscan Red, repeat last 2 steps, then repeat with Dark brown.


Step Five: Coloring the belt, lace, boots and earrings
  • Color each item completely in with White.
  • Outline each with Black then CAREFULLY blend the black and white together (start in white and work toward black), making certain to leave some white areas as highlights. By blending the black and white at same time, you get shades of grey mixed in without actually adding grey.
  • Color buckles and earrings with Sunburst Yellow and shade with Burnt Ochre.

Step Six: Coloring the hair and finishing up
  • With this stamp there isn’t a whole lot of hair area to color. Use Burnt Ochre on the highlight areas and Tuscan Red in the shadows.
  • Blend, blend, blend.
  • To finish the image, go over the outlines with a ultra fine-tip marker to add the detail back in.
Okee dokee...guess what? Put a fork in us...WE'RE DONE!!!

And here, again, is our finished wench--all colored up and ready to set sail on a project! Thanks for taking the time to read my tutorial. If you have any questions...just post 'em in the comments below, or email me at gallatyn@rocketmail.com.

Hope you enjoyed it!!


June 21, 2012

A Flag Raising challenge

Over at Bombshell Stamps Blog it's Pin-up Challenge time. Our lovely Ms. June - Kim, challenged us to do a project featuring a flag. Any flag. I considered using a pair of undies strung up a flagpole...but then thought better of it. But I was SO tempted.

So what you get instead is my nautical Bombshell Angel. I mixed and matched some of her outfits to create a somewhat sailor-y look. And, I actually looked up on the internet to see what signal flags looked like. I colored it all with Prismas to make it look ship-shape!


Ingredients:

Pin-up stamp - Bombshell Stamps (Bombshell Angel, To The Rescue Bombshell, Fun 'n' Flirty)
Banner and rope frame images - public domain
Prismacolor Colored pencils
cardstock
patterned paper

June 20, 2012

Gettin' Sketchy at Bombshell

Every month at Bombshell Stamps Blog, we host a sketch challenge. As always our sketch is devised by our illustrious leader, Kathi:
I decided to use the Bombshell A Pirate's Life stamped image that I just colored up for my Colored Pencil Tutorial (to be posted on June 22, 2012 here and on the Bombshell Blog!!!). I mean...she was all dressed up, so to speak, so I had to put her somewhere cool. She is stamped and colored on Kraft cardstock with my coveted Prismacolor pencils. Here's my take on this month's sketchy sketch. I actually sort of followed the sketch this time. Amazing.

So come and play with us at Bombshell! You have until the last day of June to enter this month's sketch challenge for a chance to win FaBuLoUs prizes!

I'd like to enter this in the following challenges:
Ingredients:

Stamps - Bombshell stamps (pirate wench, skull and crossbones, banner) all from A Pirate's Life
Nestability die - Spellbinders (lg deckled Oval)
Prismacolor Colored Pencils
Patterned paper - Scenic Route
ribbon
leaf trim
mesh
Kraft cardstock

June 17, 2012

Father's Day-o-rama

I'm not in a chit-chatty mood...but I did want to post the Father's Day cards I made this year. As I said last year, I'm blessed to have 4 fathers--one biological, one step, one in-law, and one heavenly. I only made 2 cards this year (but I did help Jonathan make one for his dad, so that kinda counts as 3).

I love all my dads.

Here is what I whipped up in the labora-Torrey for my patriarchal posse of papas.

The first one is for my biological dad, Wayne (note: I didn't say "real"...'cuz they're ALL real to me). It features my hero, Einstein. Of course you know that if ANYONE would have a digital cartoon of Einstein, it would be me (thanks to the fabulous Ron Leishman). I call this card  
"Nerd Camouflage"
 --see how Einie sort of blends in with the background? I colored him with my Prismacolor pencils and added some white pen for detail.


The second card is for my stepdaddio, Richard, aka "Reesharr (that's the "French" pronunciation). Reesharr is a self-proclaimed "pepper belly". This means that he has either developed a taste for all things spicy hot...or that he's completely burned out all his taste buds and cayenne is the only thing he can still sense. Another thing about Reesharr is that he always wears a cap. Come to think of it...so does my other dad, Wayne. Maybe my mom had a thing for guys who wear caps.

I found the perfect hat for Reesharr for Father's Day. It has red, yellow and green chili peppers all over it. I tell you this because of what I put inside his card.  Here is the outside of his card. I colored this image in...PHOTOSHOP. You read that right. I did add the shadowy stuff around him with colored pencil once he was printed out...but all the rest of the coloring I did in Photoshop. Can't tell, can ya? Me either. To me it looks just like what I would have done with my colored pencils. It was an experiment ('cuz that's what I do here in the labora-Torrey--'speriment). I say it was a successful one at that!


Oh...here is the inside of his card...see, now you understand why I told you about the hat.


Ingredients:

Images - Ron Leishman
Patterned paper - Die Cuts With A View and Flair
Prismacolor color pencils
black gems - Prima
Black fabric paint - Tulip
gingham ribbon - Offray
cardstock


I Haz BEEEEG Newz!!!

Yo Yo Yo,

I've been bustin' at the seams, not being able to say anything. But the time has come that I can FINALLY shout it out!!!

I am proud and honored to announce that I am one of the newest members of Kenny K's design team!!! WOO HOOOOOOOOOOO! And, since we have GUYS on our team now, they had to change the name from Kenny K's Krafty GIRLZ (I'm sure Andy and Mike are THRILLED that they aren't gonna have to be called a "Girl"). The new name of the KK DT is:


Along with the new name is a whole new challenge blog that will be up and running on July 1. Until then, y'all can still enter challenges at the "old" digs here:  

I'd like to put a shout out to my fellow Krafty Krewmates! Time for a roll call, I'd say. So, without further ado, here is DA WHOLE  KREW--both new and returning members!!! They've split us into two teams (A and B) and we'll be alternating between the challenges. This means y'all will have TWICE the inspiration and DOUBLE the FaBuLoUsNeSs!!! SNAP!

Brandy Newbies

Well-Seasoned Returnees


Now, did you notice who ELSE is on the Krew with me??? My bestest friend in the whole universe and muse extraordinaire-- JODI A.!!!!!  I guarantee the folks at Kenny K haven't got a CLUE what they've gotten themselves into by having BOTH of us on their team....but they're about to find out.

(doing the Snoopy happy dance)


June 13, 2012

Oh Hail No

Here are a few things I know:
  • I know I live in Texas
  • I know Texas is in the middle of tornado alley
  • I know, speaking generally, things ARE bigger here
  • I know spring/summer storms can be volatile, at best.
Here are a few things I DIDN'T know (until today)
  • "Pea size" hail in Texas is really golf ball size
  • "Golf ball" hail in Texas is really tennis ball size
  • Texas hail is EVIL...and SPIKY.
  • Ducks are stupid.
So, today we got our first hail storm of the season...and it was a doozy. I've never seen hail this big...or spiky. This hail was not smooth marble-like projectiles...these were spike-laden missiles of death.

Don't believe me?

See for yourself.

It's hard to tell by this photo...but these things had spikes protruding from ALL surfaces. They were little frozen Medieval maces--you know, the ones covered in spikes and connected to a stick by a chain. And they were HUGE...this sucker was over 3 inches across. DANG. It now lives in my freezer, so I can marvel at it whenever I want.


The hail started out "normal"...like little peas from heaven. Then the storm very quickly evolved and began hurling icy death bombs from the sky. The picture below is right when it transitioned to golf-ball hail. This is my front yard.


After it rained down golf balls...it started throwing those spiky hail monsters at us. The one below reminded me of a little frozen sun. It was actually quite beautiful. Deadly, but beautiful. Can you imagine getting hit by one of these suckers?


The storm slowed down and turned to rain just long enough for me to run out into the yard and gather up some hailstones for closer inspection. Then, it started back up again...and progressed back to golf ball-sized hail. And NO...I wasn't an idiot. I didn't run out in the yard WHILE the golf-ball-spikes of death were raining down. SHEESH, give me some credit.

In the photo below note the one in the middle. SEE IT??? It has Jesus' face on it!!! Wait, it actually looks more like Elvis. NO WAIT...maybe that's William Shatner. No matter...I'll make a KILLING on Ebay.


I even found a lump-o-hail that had a Zombie face! brains, Brains, BRAINS!!!!


Our cars, trees and bushes took quite a pounding. No windows broken. Jonathan's going up to inspect our new roof tomorrow (*cry*). We got lucky. About 2 miles south of us, the hail was softball size and it was breaking windshields, sky lights and destroying trees and roofs.

Oh, and my earlier comment about stupid ducks??? There was a mated couple of mallards 3 doors down...standing in the middle of the lawn during the golf-ball pummeling. They FINALLY waddled under the bushes for cover...but MAN...they stood out there for 5 minutes. DUMB.

Here's a video from the news last night.
Dallas Hail video 


June 12, 2012

Hoppy Anniversary

Just finished whipping up a card for my parents-in-law for their anniversary. I'm not sure which one it is for them...it's around 40 give or take a couple of years. (I figured this out, because I know how old my hubby is...)

It's a simple card, but heartfelt. Ya know...coloring stuff to look like fur is not easy. I cannot tell you how many layers of color I laid down to get a "fur" effect...and I'm still not happy with it. I'm definitely gonna have to research this technique before I try it again.  By the time I was "finished" coloring, I just wanted to get this card put together and call it done. I do like the way the ribbon wraps through the frame. It actually curved to form what sort of looks like an organza noodle weaving through.


Ingredients:
Bunny Hug image - Motivet Rubber Stamps
Dies - Spellbinders (Lacy Circles, Ribbon Tag Trio Two)
Prismacolor colored pencils
organza and grosgrain ribbon
gems
patterned paper - Scenic Route
embossing folder - Sizzix
cardstock


June 10, 2012

Cookin' in the Labora-Torrey

Just had to do one final card for the Kenny K DT call. Just HAD to. I mean, Jodi entered 5 cards...so that means I have to enter 5 cards. Like the Bombshell Stamps DT...this is one I'd REALLY love to be a part of. We'll see in about a week or so when the notifications go out.

No worries, I'm not holding my breath or counting unhatched chickens. I just think I would do them proud and have fun in the process. Especially if Jodi and I BOTH were chosen for the team!!!

So, here's my card. I used Kenny K's Chef stamp. Isn't she sassy? I am impressed that she doesn't have her own set of flotation devices and that there is absolutely no cleavage showing. Such a departure for the K man. hee hee hee. She does, however, have a really large...hat. I wasn't quite sure what to do with her feet...and looking at them now, she almost looks like she has duck feet. Almost.

I'd like to enter this card in the following challenges:

Ingredients:
Chef image - Kenny K
Banner - Bombshell Stamps
silverware - created myself in Photoshop
Prismacolor pencils
patterned paper
gems - Studio 112
ribbon


June 9, 2012

Welcome to the dark side, Heidi!

I've been blessed this week to have my sister and nephews visiting here from Colorado. Who in their right mind would come to Texas in June is beyond me...but I never said my family was in their right mind.

I've been trying for YEARS to get my sister into paper crafting. First, I tried luring her into scrapbooking. I sent her cute supplies and got her hooked up with basic tools. At that time she had two little boys and, therefore, LOTS of photos and memorabilia to immortalize. Somehow, that went absolutely nowhere, and I ended up being the one to scrap pages of HER kids.  She once told me, "Torrey, why do I have to do scrapbook pages of them when you're around?? I'll just send you pics and have YOU do it--since you're such an uber pro, they'll look FANTASTIC".

Flattery will get your scrapping done (by me) Heidi.

So, I gave up on ever getting her to do scrapbooking.

But something magical happened when she laid her eyes on my newly-reorganized studio. You could see the creative spark ignite. She said that she could DEFINITELY get into card making--that the whole idea of it seriously THRILLED her...but she didn't know how to start.

HOT DOG!!!

She sat across from me while I created the Sonic b-day card for my nephew. She watched intently at how I put together a card from the ground up. With each step of making that card...I taught her something (without her knowing it)
  • how to use a die cut machine
  • how to color with colored pencils
  • how to choose a color palette
  • how to choose papers
  • how to choose embellishments
  • how to layer
  • how to emboss
  • how to design the layout
  • how to use basic tools (trimmer, crimper, Xacto)
  • how to manipulate images in Photoshop
That creative spark caught hold...and things started to smolder!!!

Yesterday, she decided she wanted to try her hand at card making. So, she sat across from me and she made her very first card. She was so proud of her creation! She should be!! It's FaBuLoUs.

Heidi went back home today. As a gift to her, she left with a "new" Wizard, some dies, some embossing plates/folders and the now-burning desire to make cards.

Don't let my innocent-looking exterior fool you...I have "ways" of converting people into paper crafters--ways AND skillz.


Welcome to the dark side, Heidi. And I didn't even have to give you any cookies.

Mwa ha ha ha ha ha.

June 7, 2012

Super Sonic Birthday

My sister and her kids are visiting from Colorado. Well, they're hardly "kids"--one's turning 17, the other is 20. The one who is turning 17 is doing so in a couple of weeks. I thought it would be nice to celebrate his birthday (and his brother's half-birthday--who was born on Christmas Eve...bummer) while they're here...since I only get to see them every few years.

Which is a total bummer.

But, don't get me started...'cuz nobody invited the drama llama to come play today.

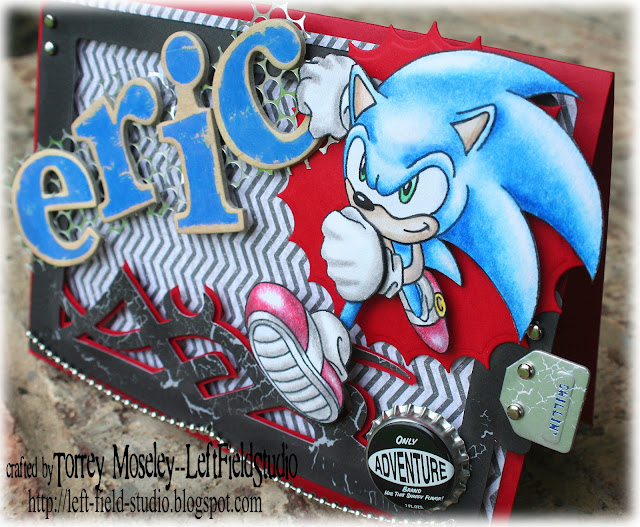
So here is the card I made for the almost-seventeen-year-old, Eric. Eric is a gamer dude. He loves characters from many different video games. So, I decided to feature one of them on his card. I chose Sonic. I like his hair (or whatever it is). He's cool looking. I could have just as easily chosen Link from the Zelda series...I know Eric likes Link. Heck, he dressed up as Link for Halloween like 8 years in a row. Each year his costume was a little different to reflect Link's changing look. My sister spent countless hours making his costumes. They were all fabulous.

But, today he gets Sonic.

Because, I like his hair.

Oh...I said that already, didn't I?

Here's his card. I found a line drawing of Sonic somewhere on the internet, printed it out on white cardstock and colored it in with my trusty Prismacolor Pencils. I fussy-cut the sucker out and paper-toled him to create a very dimensional Sonic. I dug up some VERY old chipboard letters and used a pre-cut frame which I outlined in hand-cut red cardstock.. Finished it up with some random embellishments, brads, Punchinella and ball chain. You guys know by now...I make very lumpy cards and scrapbook pages. I may be flat...but my artwork isn't.

Happy Birthday, Eric!!!

I'd like to enter this card in the following challenges:
Ingredients:
Sonic image - internet
Nestability die - Spellbinders (inverted scallop circle)
patterned paper, frame, chipboard tag - Little Yellow Bicycle
brads - Creative Impressions
chipboard letters - Li'l Davis
Prismacolor Colored Pencils
ball chain
bottle cap embellishment
Punchinella


June 4, 2012

It's a Kenny K kind of day

Quick post here.

Yes...it's possible.

Sheesh.

I just made another card with a Kenny K image to add to my portfolio for their DT "application". I really like the way it turned out. It is SUPER dimensional...like 4 layers separated by foam tape. This makes the FaBuLoUs image literally pop off the page...the wheels are separate from the skateboards which are separated from the kids which is set off from the background--all on their own layers.


Let's get a closer look at those layers...
 
I'd like to enter this in the following challenges:


Ingredients:
Skateboard kids - Kenny K
Prismacolor colored pencils
Patterned Papers - Little Yellow Bicycle
Ribbon
brads - Creative Impressions


June 2, 2012

The Unveiling of...The Torrey Zone.

I live by the adage "I'm not messy...I'm creative"...but, to gaze upon the ferocious chaosity that was once my studio, one would probably think to oneself, "Come on, Torrey...NOBODY is THAT creative." As many of you may (or not) know, I have recently OVERHAULED my studio. I just couldn't stand the clutter anymore. Now, let me preface this unveiling with the fact that my newly-overhauled studio is NOT like those beautiful matchy-matchy Martha Stewart Pottery Barn rooms. There is NOTHING "designer" about it. It's hodge-podge and filled with bits of stuff I love. It's functional but NOTHING matches...and I like it that way. After all...how many of us actually have the funds to devote to a designer studio??? Sure, I wouldn't turn one down if it were handed to me...but I like my quirky, funky studio. It's a reflection of who I am--complex, diverse...creative.

(Okay Sherman, set the "Way-Back" machine to a couple of years ago).

BEFORE
 ...this is what my studio here in Texas USED to look like before I went on my Martha-Stewart-organizing frenzy: piles of stuff EVERYWHERE and just the tiniest of pathways to my chair (see that little patch of carpeting? That's the path). Now, you have to understand...having a disaster area as a studio is not new for me. Au contraire. As a matter of fact, in 2003 Memory Makers put out a book titled ""How to Organize Your Scrapbook Workspace". If you turn to page 10 of that book, you'll find a photo of my studio back when I lived in Colorado. Was it neat and tidy? Heck no. I was the "before" picture. The editors approached me and asked (very nicely) if I would lend evidence of my messiness as a beacon of hope to all those in need of organization. I agreed and thus became the literal poster child of a train-wreck studio. *sigh*...the things I do to help other artists feel like they're not alone. I'm selfless like that.

When I moved to Texas, I had the best of intentions on getting my studio organized...but a month after I got down here, I ended up with a severe injury that left me bedridden for several months--unable to walk. So my studio NEVER got unpacked properly. This led to a MASSIVE pile of disorganized chaos. I could NEVER find anything (gee, ya think?). It was completely...STIFLING. I now cringe at the sight of this.

 So, I made a goal for myself--to FINALLY clean out and organize my studio before my sister and nephews arrived for a visit on June 1. From the ground up. Every drawer, every shelf...everything.

I started by taking accurate measurements of every piece of "furniture" in the room--every table, bookcase, storage tower, cubby thing...everything (even the room itself). I found a free "room arranging" program online that allowed me to figure out the most optimal placement of all my "stuff".

I boxed up EVERYTHING and hauled it to the living room and hallway. I then enlisted the help of my dear hubby, Jonathan (DHJ). DHJ helped me drag all the furniture into place and then he built me some lovely shelves on the east and west walls. With as much stuff as I have, I had no choice but to go vertical. Then box, by painstaking box, I unloaded EVERYTHING. Then I labeled EVERYTHING.

Without further ado...here is the final result--the unveiling, if you will, of...
the TORREY ZONE (aka the Labora-Torrey).

The doorway into the Labora-Torrey
A painted metal Poison Dart frog perches on the door jam as a flutter of 3-D butterflies gently flies off into the distance. I recently took the door off. It was getting in the way. Maybe I'll hang retro hippie beads-groovy baby, groovy.

Enter, the Torrey Zone
Standing in the doorway of the Labora-Torrey, this is what you see when you first walk in. I will start the tour from the immediate left--the SOUTH WALL--and continue clock-wise around the room.
I feel like a tour guide at Disneyland.

 "We're walking, people....and we're stopping here at the SOUTH WALL."
(makes stewardess-like hand motions)

South Wall
From L to R--Tools, Books, Stamps
  • On the far left is the hanging "shoe" organizer that holds tools like heat guns, Cropadiles, crimpers, light boxes, wood-burning tools, acetylene torches, C-4 (just kidding...I don't have a light box) .
  • The bookcase in the middle houses my "library" of craft-related books and magazines--most of which feature my artwork, and several of them I've actually written. How cool is that?
  • The right bookcase is where all my mounted rubber stamps live. I have them divided into plastic shoe boxes according to "theme" (Asian, Animals, People, Retro, Travel, Food, Flowers...etc.)
South Wall...complete view
 Next to my stamps lives my "pantry". Its face is covered in bits of inspiration. The left side of the front is plastered with a bunch of "tags" from a tag swap I was in. The right side hosts various bits and pieces of things I love. On the top are my "tool boxes" (each filled with specific things). On the right side, of the pantry itself, is home to my Martha Stewart and border punches-- all neatly hung on Ikea rails. 

Pantry-inside
Here's what you'll find on the inside:

L to R, Top to Bottom
  • die cutting systems/dies, embossing folders/plates, stencils
  • Letter embellishments, fancy buttons, Bedazzler/rhinestones, polymer clay, tools, oven
  • Metal and their tooling supplies, glue gun, binder punch, Dremel, adhesive machines
  • Stickers, bulk OMS, punches

Closet
 And here is the closet which is just to the right of the pantry. It holds overflow and stuff like spray paints, glues, more stickers, glass, Dymo label makers and a giant roll of yellow "caution" tape. What? Doesn't everyone have a giant roll of "caution" tape?

It is a walk-in closet, so you can't see the spaces on the left and right sides from this photo. On the left side is frames and misc. boxes (tucked out of view). On the right side is an Iris cart filled with fibers and beads. You'll notice, I took the door clean off of this too. Who needs doors?
 -----------------------------------------------------------

 Moving around now to the WEST WALL. The west wall is where all my Iris Carts and the "wall o' paper" reside.

West Wall corner
 New shelves built by DHJ!!! Buttons and ribbons (and UTEE) on the shelves. There is a loose shelf resting on top of the Iris carts. On it you'll find my spinning cube o' paint--acrylic on this side, fabric on the back. Next to it, my Wizard and most-used Spellbinders Nestability dies. Yeah, that's a giant Peep on the top shelf. Doesn't everyone have one in their studio? Oh yeah...see that black case on the middle left shelf way in the back? That's where my Copics live. Hee hee hee.


West wall- complete view

Iris carts on left hold everthing from embellishments, doo-dads and whatchamacallits, to adhesive runners and refills. The cart just to the left of the TV holds my scrap paper. The one under the TV holds my pens, pencils, markers, paints--colorants of all kinds. Next to the Iris carts is my "wall o' paper". Since this picture was taken, I have TOTALLY rearranged this unit because I got an AWESOME deal on plastic paper boxes. Can you say "buh BYE pizza boxes? (more on that in a minute). OH!!! And there's Einstein. He watches over everything I create. He's my guardian angel. I also have Tibetan prayer flags watching over me too. Not that I'm Tibetan.

Wall o' Paper
Here is my newly revised wall o' paper. I admit it, I LOVE paper. Try as I might, I could just NEVER become a digital artist. I luvs mah paperz 2 much. I recently scored 20 clear-plastic paper cases (from Michaels). It was SUCH a good deal, I couldn't NOT do it. I filled them with all the color-arranged patterned paper I had previously stowed in pizza boxes--badly deteriorating pizza boxes I might add.
  • Top shelf is 12 x 12 patterned paper arranged by color and a basket of small scraps. 
  • Second shelf is 12 x 12 cardstock. 
  • Third shelf is 8.5 x 11 cardstock and patterned paper and small paper pads.
  • Bottom shelf is white-core cardstock and large paper pads--most of which are by DCWV (Die Cuts With a View for those not in the know).
  • On the ends of the bottom 3 shelves are boxes of patterned paper arranged by manufacturer/theme.
 -----------------------------------------------------------

Now, we continue on the clockwise journey to the NORTH WALL...the workhorse and heart of my studio.

North Wall
Here is where my work surfaces are. I have 2 tables--in an "L" configuration. Here is where all my most-used tools/supplies are housed, like:
  • Blank cards/envelopes
  • scissors
  • rhinestones/gems
  • glitter
  • acrylic stuff
  • alcohol inks
  • tags
  • corner and hole punches
  • adhesive dispensers
  • pens/pencils
  • tape
  • distressing equip.

My Work Surface
Here's where I create--on my lovely Ikea gate-leg table. I can fold out the left leaf to accommodate at least one (maybe 2) additional crafty friends. There are my buddies, Hoops and Yoyo, keeping me company (it looks like they've had too much caffeine). I have all my Prismacolor pencils stored in this wine rack with plastic cups. It's TERRIFIC! I picked up the idea from an organization issue of Better Homes and Garden. Hi Einstein...I see you! (see? He's always watching).

Ribbons, inks, and more stuff...OH MY
Hmmm, this photo seems to be listing to the right. Or maybe I was.

To the left,  in the black Iris cart, are my artificial flowers, wooden stuff and metal stuff. That's a tub of unsorted stamps on top of the iris cart. The top part of the "Chester drawers" thing  are two shoe-cubby storage units that I picked up at an estate sale. I found boxes on Ebay that just fit in their cubbyholes. I attached wooden knobs as pulls on each "drawer". I store my stamping ink and stamping paraphernalia in the bottom cubby. In the top cubby, I have my sewing notions and other miscellaneous things. I haven't printed out all their labels yet as you can see.

Ribbon galore
In the "Chester drawers" (that's actually what I thought they were called when I was a kid--and I wondered who Chester was and why would they name drawers after him). On the bottom, I stow my ribbon--4 drawers total--arranged by color of course. This is what each drawer looks like inside.

  -----------------------------------------------------------

Last stop...the EAST WALL. This is where my computer and Cricut are.

East Wall
My computer table is on the left. Cricut station on the right. These are my new shelves that my DHJ installed for me!!! Aren't they WONDERFUL? The bottom shelf holds a bunch of pretties and inspiration...stuff that makes me happy.. The middle shelf holds albums, wire/tools, 3-ring binders of unmounted acrylic stamps (a work in progress) and foam stamps. The top shelf has my alterable stuff, some craft books from when I was a kid (Family Creative Workshop) and empty bottles. The sunflower box has all my sewing patterns.

Cricut Station
The cart my Cricut is sitting on is an old dentist tool chest from the 1950s. I found it at a garage sale, and it begged me to come live in my studio. I keep all my Cricut cartridges in the bottom 2 drawers (I have over 30 of them...but if you talk to my husband...I only have 3, got it?). I also keep brads and eyelets in here along with a drawer filled with Cricut paraphernalia. And I actually have 3 or 4 drawers that are still empty. Guess I need to get MORE stuff. Hee hee hee.

Thus ends the tour of the Torrey Zone.

Admit it...y'all are just ITCHING to come play with me in the Labora-Torrey now, aren't you???? 

So what's keeping you?
(I'm serious...I want playmates)