As promised, here is my post about the uber-swanky tea party my mom and I just hosted. It was a RAVING success!!!! We are totally exhausted...but in a good way. Heck, I even lost 5 lbs. this week from all the running around I was doing--BONUS! I am going to break up my coverage of this gala event into several postings over the next week or so. So, keep checking back for more tea party goodness!
How it all started...
A little over a year ago, my friend Andrea and I were talking about tea parties. She asked me if I would have a tea party, and could she please come...to a REALLY tea party (not the pretend kind with stuffed animal guests, Koolaid in the tea pot, and Oreos--though I like Oreos). I promised her that, yes, I would host a "real" tea party, and that she would be our guest of honor. Andrea is 3 or 4 years old (I forget which). Did I mention this was last year?
I'm s l o w.
But...
It was TOTALLY worth the wait.
When we finally decided we would, indeed, take on this monumental task, we did so in stages (I say "we" because I coerced my mom into doing this with me...I didn't have to twist her arm very hard). The whole planning process took about a month...maybe two. The production part took about 2 weeks. The whole thing actually started with the keepsake favors I wanted to give to our guests as "thank-you-for-coming-and-stuffing-your-face-with-us" gifts. Because, before we even had a menu in mind, I KNEW it would be a decadently lavish affair. I mean, come on...this is ME we're talking about. I don't do ANYTHING half way. And, my blessed mother got dragged along behind my creative train throughout this event.
She's a trooper, my mom.
And, she's one heckuva sous chef.
But, I'm getting ahead of myself.
The Favors:
I can't claim creative genius on these...as I got the idea from Pinterest. I love Pinterest. I get some absolutely amazing inspiration there. And some...not-so-inspiring stuff that makes me scratch my head like a Minion and go "Whaaaat?"But, I digress.
I decided we NEEDED to make tea cup candles. You know...real china tea cups with wax poured in them and wicks....CANDLES. They looked amazingly cute when I first saw them somewhere in the deep, dark recesses of Pinterest. There was only one problem. I've NEVER made candles IN MY LIFE. Ever. I know what you're thinking, "But Torrey...you grew up in the 1970s, back when EVERYONE AND THEIR GRANDMOTHER were making candles of some sort or another!"
In my defense, I did macrame with my grandmother...and made padded frames with calico fabric and eyelet lace. That should count. With my other grandmother...I cooked. She taught me to cook from the time I was tall enough to see over the counter top. More about her in a later part of this multi-post tea party extravaganza.
But, I'm a crafty chick. I KNEW I could figure this all out! So, I started doing research on candle making. Talk about information overload. But, I got the gist of it. Then I set out to figure out where to buy wax. I went to my favorite big box craft store. It was REALLY expensive there. Then I went to Ebay. I found some good deals but I thought having wax shipped to me in August...in Texas...was probably not a wise choice.
I turned to the yellow pages and found (to my surprise and delight) several candle making supply places within a few miles of my house! I decided we'd get our supplies at AAA Candle Supply (click on their name to go to their website). Their prices were very reasonable and they said they had lots of scents to choose from. "Lots of scents" was an understatement. When mom and I walked into their storefront, there was an entire wall lined with about 4-5 rows of shelves...on which, about every 2 inches, was a little brown bottle of "scent". There must have been 200-300 bottles on that wall. We smelled scents until our smellers wore out.
They had some very "odd" scents too (that weren't particularly appealing). The tobacco scent was interesting. The "Thanksgiving Dinner" scent was absolutely disgusting. One should NEVER put meat scents in a candle. Unless it's bacon. Then that's OK. I decided I didn't like anything with "butter" or "caramel" in the title. There was even one called "Butt Naked" (I kid you not). You don't even want to know what it smelled like. I figured they put that one in there to a) See if anyone noticed and b) as a joke. We wanted a light, clean, summery fragrance. We ended up choosing "Fresh Linen". It was perfect...crisp, clean, slightly floral.
At AAA Candle Supply they also have glass containers of every size and shape, as well as molds, wicks, wax, colorants, and all other manner of candley goodness. They were most helpful as I admitted that I was a TOTAL candle-making virgin. I had no idea how many choices in wax there are. I always thought...candle wax is candle wax is paraffin.
I was wrong.
There is soy wax, and beeswax, and palm wax, and good old paraffin, and soy-paraffin blends, and beeswax-soy blends, and stuff called Parafflex, and different grades of each wax with technical sounding names like IGI 4630. There is wax for pillars, wax for votives, wax for containers, wax for mottling (I don't know what that is either), wax for hurricanes, wax for tapers...Oy vay. I asked the saleslady which one would be ideal for what we were making. She suggested their soy-paraffin blend. She said it was single pour, had good scent throw, and carried a scent load capacity of 12%! I had no idea what that meant, but she seemed proud of that fact so I played along and said, "Oooh, that sounds really good!". She said it was their most popular wax. Who am I to argue with the masses?
Then we had to discuss wicks. Again, I thought, "wicks are wicks are basically pieces of string". Wrong. There are as many different types of wicks as there are waxes...there are standard wicks, paper core wicks, zinc core wicks, wood wicks...all in different lengths and diameters. Oy vay. She asked how big the tea cups were that we were using as containers...and I said, "Oh, you know...tea cup size". Brilliant. She put back the "standard" wicks and grabbed the next larger-diameter size wick and said, "well, these will ensure that all the wax burns inside and not just a hole in the middle". She was the boss.
We bought the smallest chunk of wax they sold...10 lbs. She brought out this HUGE slab and slapped it down on the counter. It was solid, but VERY soft...squishable with your fingers soft. She also sold us a bag of 6-inch wicks. I told her we only needed like 12. They came in a bag of 100. We have wicks to last us into next century.
Now that we had the supplies, it was time to focus on the tea cups. We had a BALL scouring estate sales, garage sales, and thrift stores for tea cups and coordinating saucers. All the cups we got were unique--not a duplicate in the bunch. Tall ones, short ones, dainty ones, hefty ones...there were even a couple of Limoges, a Franciscan, a Haviland, a Mikasa, a Paragon, and even a Royal Dalton. It was quite the assortment! Unfortunately, not all the cups came with saucers. So we had to find saucers that went well with those that didn't have a mate. We did a pretty good job!
They turned out LOVELY.
Here is the process, in photos!
Step 1--The Supplies
Step 2 -- Melting
It's been SO BLASTED HOT here in Texas, I could have just set the wax outside for about 10 minutes and had it melt. But, I didn't want to go outside. I also didn't want to melt wax in my good pots and pans and there was no way I was spending $20 on a special "spouted wax-melting receptacle". Coffee cans to the rescue! We squoze (that's a word) one side into a rough spout shape and placed it in a pot of water and added the wax. Worked slick as the proverbial whistle. Before melting, the wax had the consistency of cold butter. Seriously. It was that soft. It melted FAST. When it was all melted, I added the scent --precisely 1.5 oz per pound of wax (those were my instructions). Who am I kidding? I didn't measure. I just dumped some in.
Step 3--Making Propellers
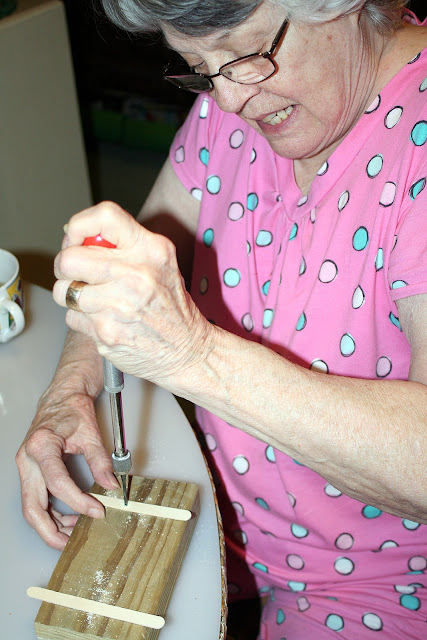
As I discovered that wicks like to float, I was concerned about how to keep the wicks in place while the wax was setting. I found a FaBuLoUs tip that involved drilling a hole in a Popsicle (craft) stick, laying it across the top of the cup, sticking the wick through the hole, and using that as an anchor for the wicks. Worked like a charm. Here's mom drilling the holes in the sticks. I think they looked like little propellers. In fact, that's how we knew we were all the way through the sticks when drilling them...they'd spin around like a propeller!And yes...she's in her jammies. You'll see a good number of photos of us in our matching polka-dot jammies. We ended up working on these projects for the party either very early in the mornings or in the late evenings.
Step 4--Finishing Touch
After they were set (overnight), we glued on their corresponding saucers with E6000 glue. That stuff will glue an elephant to your refrigerator and then the refrigerator to the side of your house. When the glue had set (overnight)...I added a label to the bottom of each saucer.
Step 5--The Final Product
This is the candle I chose for myself (yes, mom and I made candles for ourselves too). I love its shape...it's very wide and short (kind of like me) and extremely delicate/translucent (kind of like me). Stop laughing.
Step 6--End Thoughts and #SelfieFail
I snapped a selfie of us when we finished. I'm selfie-challenged. Really challenged. My arms are too short or something. I guess I'm just not part of the selfie generation.
I snapped a selfie of us when we finished. I'm selfie-challenged. Really challenged. My arms are too short or something. I guess I'm just not part of the selfie generation.
These turned out so cute! They were pretty easy too! We ended up only using about half the wax...so we can make more someday. Stay tuned for part 2--The Invitations!!
And thank you, as always, for coming out to visit Left Field.


LOVE these candles! Love reading about your ideas, love where the idea came from! I am sure little Andrea was thrilled.
ReplyDeleteThese candles are great!! I love hearing about the process. =)
ReplyDeleteLove these candles! What a lovely party favour! I always enjoy your writing and can't wait for the next installment. Nice to be able to do this with your mom :)
ReplyDeleteWhat a fabulous party favor. It's so cool that you were able to do the party planning and such with your mom!
ReplyDelete