
I wanted to post this project I did for Maria at ItsCheaperThanTherapy. I'm tellin' ya...if you want all things Sizzix...go see Maria. She's got it all! I'm making some samples for her to bring to trade shows, and the piece I'm about to show ya is one of the "big" ones. Big as in it was made from a LOT of Sizzix product. Many, many dies and embossing folders. Many, many hours. A lot of stained fingers and one tiny accident involving the X-Acto knife and a squirrel.
I was garage-saling not too long ago when I found this little orphan wooden drawer. It was painted white (at least that was the latest coat of paint it had showing...there were many layers underneath, to the point where all the inside corners were no longer square -- not even close. It is a great size and the price was right. How many other people (besides me) do you know that would buy a 7x9 inch overly-painted orphaned drawer? To me, it was a treasure.
I cleaned off the layers of dust and dirt, and removed its brass pull (which I used in the project as the stand for the dress form angel). I covered every square inch (inside and out) with terracotta-colored cardstock which I embossed. I then, painstakingly, began the process of transmogrifying it into distressed and verdigris copper. It's amazing how the surface of the shadowbox looked like riveted metal when I got finished. Anyway, here it is....I call it, "No. 7"
No. 7

And now for the "tour".
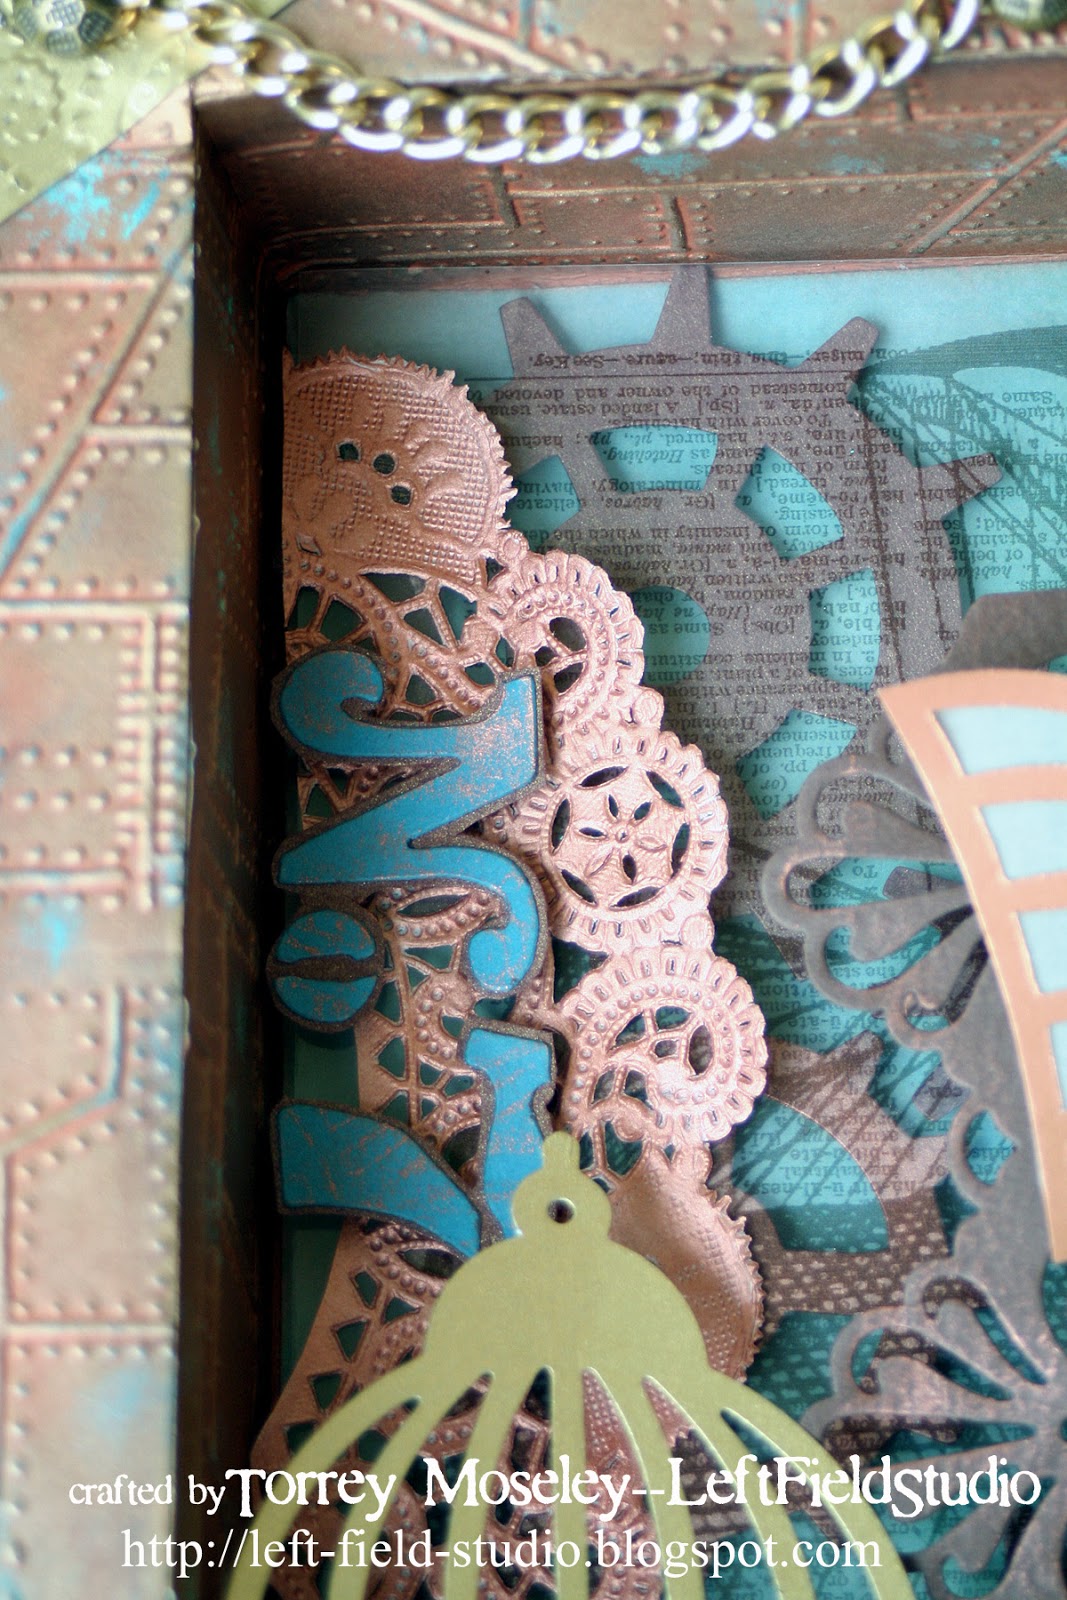
 Starting with the riveted surface...as I said already, it began life as terracotta-colored cardstock. I ran it through my BigShot using the Riveted Metal embossing folder. I adhered it to the sides, front, top, bottom and all inside surfaces. Then, I rubbed it down with antique gold Rub 'n Buff. That stuff'll get you high as a kite. After the Rub 'n Buff, I dabbed on aqua acrylic paint here and there. I sponged on black stamping ink to age it a bit. I think next time, I'll start with verdigris-colored paper and metallic
it up. That way, the patina will actually be where it's SUPPOSED to be
(in the recesses) and not just helter-skelter on the flat surfaces. I fashioned "brass" corners out of gold paper that I embossed. Some upholstery tacks hold up the decorative gold chain that drapes across the front. Moving on to... the background.
Starting with the riveted surface...as I said already, it began life as terracotta-colored cardstock. I ran it through my BigShot using the Riveted Metal embossing folder. I adhered it to the sides, front, top, bottom and all inside surfaces. Then, I rubbed it down with antique gold Rub 'n Buff. That stuff'll get you high as a kite. After the Rub 'n Buff, I dabbed on aqua acrylic paint here and there. I sponged on black stamping ink to age it a bit. I think next time, I'll start with verdigris-colored paper and metallic
it up. That way, the patina will actually be where it's SUPPOSED to be
(in the recesses) and not just helter-skelter on the flat surfaces. I fashioned "brass" corners out of gold paper that I embossed. Some upholstery tacks hold up the decorative gold chain that drapes across the front. Moving on to... the background.
There is a piece of watercolory aqua paper with coppery inked edges laid down on the back. I then pop-dotted cardstock gears (out of metallic papers) all over the aqua background. Then, I placed a transparency (printed with text and a vintage image) over the gears...the background has a LOT of dimension and depth.

Now on to the Angel. She is a conglomeration of various dies and their bits and pieces. Her body is a dress form. Her wings are the tops of the birdcage with one column of bars removed and vellum set behind them. Her dress is made from the pocket watch die, a section of the Damask die and part of the birdcage (with the outermost columns of bars removed. The watch face is a Coke can. I ran it through the BigShot and embossed it over a metal watch face embellishment by Tim Holtz. This way, I replicated the watch face...but still have the original so I can do it again and again. Tricky, huh? I painted the soda can version then sanded it and aged it with black stamping ink. Her halo and hair are gear diecuts. Her face is a stamp by Hampton Arts. A couple of decorative brads finish her look.

Next, is the clockwork bird. Believe it or not, this is the bird that comes with the Caged Bird die set. I just...um...jazzed him up. I cut him out using teal cardstock. I ran the diecut bird through the BigShot with the Gears embossing folder...I was careful to position him JUST RIGHT so that the gears created the pattern I wanted. I took leftover pieces from the Damask die and fashioned a topknot and his wing. His glorious tail is part of the Damask die (cut out the same way that I did for the angel's dress). I rubbed on copper stamping ink to highlight the detail and added his wind-up key to finish him. The cage behind him is the one from that same die set. I cut away some sections of the bars and cut up a second cage to create the open door.
The final
photo is where my piece gets its name.This photo shows more detail of
the background too. I inked up a white paper doily within an inch of its now-copper life and placed it behind
the diecut No.7 (which I dabbed lightly with copper ink).
I will be sad to see this piece leave my studio...but I know Maria will love it and (in all hopes) it will inspire many crafters to experiment with their dies...and buy MORE dies...from Maria. Thanks for stopping by!
I am entering this in the following challenges:
The Paper Players - #140 Recycle It (the box is an old wooden drawer)
Hotshot Craft Blog - #15 Anything But a Card
Stampin' For the Weekend - Anything But a Card
Creative Craft Challenges 2 - #7 Alter It (the box is an old wooden drawer)
I am entering this in the following challenges:
The Paper Players - #140 Recycle It (the box is an old wooden drawer)
Hotshot Craft Blog - #15 Anything But a Card
Stampin' For the Weekend - Anything But a Card
Creative Craft Challenges 2 - #7 Alter It (the box is an old wooden drawer)
Ingredients:
Sizzix Products:
- Sewing Room – Bigz (657186)
- Caged Bird – Bigz (656634)
- Cargo Stencil Number Set – Movers and Shapers (657841)
- Gadget Gears – Bigz (656636)
- Mini Clock Key & Pocket Watch – Movers and Shapers (658561)
- Damask & Scallop Borders –Thinlits (658945)
- Base Tray – Movers and Shapers (657007)
- Riveted Metal embossing folder
- Gears embossing folder (658580)
- Timepieces (Tim Holtz for Advantus
- Rub ‘n Buff (antique gold)
- Turquoise acrylic paint
- Copper pigment ink (Tsukineko)
- Memento black Ink (Tsukineko)
- Perfect Pearls – copper (Ranger)
- Face stamp (Hampton Arts)
- Cardstock
- Paper doily
- vellum
- Transparency
- Patterned background paper (Karen Foster)
- Metallic gold and copper papers
- Mini round, heart and dragonfly brads (Creative Impressions)
- Chain
- Upholstery tacks
- Soda can

Whoa! I'm not sure what to say -- words just aren't adequate after staring at this for the longest time. I can't believe this all started out with an orphaned drawer. Your creativity and attention to detail blow me away! I'm so glad you shared this with us at the Paper Players this week.
ReplyDeleteLike Amy, I am speechless over your gorgeous creation! WOW. What creativity, what vision, what details...it's all fabulous. Love the texture, the layers, the colors. My favorite detail is that adorable wind-up bird--swoon! A true piece of art and I am so glad you shared it with us at The Paper Players this week!
ReplyDeleteOh,my goodness-how detailed is this,what a beautiful creation.
ReplyDeleteBest wishes,Nessa :)
Wow! This is a stunning project with so much detail. Thanks for joining our "Alter It" challenge at Creative Craft Challenges and good luck. Hugs, Gale DT
ReplyDeleteWowza! Fabulous project. Thanks for sharing all the details of its creation!
ReplyDeleteGorgeous project. Thanks for joining us at SFTW.
ReplyDeleteHugs
Jayne