Hi, I'm Torrey. Welcome to Left Field, where creativity runs amok and imagination is ALWAYS more important than knowledge. Shoes are not allowed but ties are optional. This is a repository of snippets from my life out here in Left Field. One never knows what shiny bits of creativity will be found here... cards, scrapbook layouts, photography, poetry, recipes, ponderings, rantings and musings. It could be anything! Life in Left Field is always changing, always real, always ...interesting.
This is the final post of my coverage of THE tea party! I saved the best for last. Today's post is all about the lovely ladies who attended our celebration.
For those of you who have just discovered the posts about this amazing party, you'll want to start at the beginning so you don't miss anything! Here are links to all the previous party postings:
We were so lucky to have had such a wonderful and diverse group of women gather for a few hours of frivolity! I know it's not polite to divulge a lady's age...but I thought it was pretty special that we had guests ranging in age from 4 to 90. The amount of life experience in that room was staggering!
So, without further hesitation, I bring you our esteemed and beloved guests.
Miss Lucille and Janna
Fran, B.K., Kelly
Adriana and Andrea
Teresa
Dian
(with Andrea)
B.K.
Dorothy
Kelly
Fran
Miss Lucille and Dian
Torrey
Well, that about wraps it up for our High Tea, Texas Style...at least for this year. Oh, and if you're wondering about which lady belonged to which "Not-so Dirty Little Secret" that I listed in Part 4...The Entertainmentwell...you'll just have to guess. Because what was revealed at the Tea Party remains at the Tea Party.
You just should have been there!
Thanks, as always, for joining me for a romp through Left Field...where chocolate is always the crop in season.
As you can see, I took a break from my coverage of "THE" tea party. But, I'm back now with part 9...Baking Bonanza! This will wrap up all the yummy munchies we served at the Tea.
For those of you who are just joining me on this parade of Tea Party goodness, here are the links to all the previous entries so you can get all caught up!
Ok, now on with the final two contestants in the baking lolapalooza! I'll start things off with the scones we served...for a tea party just wouldn't be a tea party without scones. I am pretty sure there is a written rule in the tea party bylaws that states there must be some iteration of scones present in order to actually call a celebration a 'tea party'.
Lady Di Apricot Scones
I call these "Lady Di" scones for two reasons:
1) Because my mom wanted Apricot Scones...and her name is Dian--hence, Lady Di. 2) Because the base recipe is (reputed to be) the actual recipe for scones that was/is served to the Royal Family--in particular to the Lady Diana, Princess of Wales (and yes, that is her correct title--I looked it up).
Apparently, she could only be called Princess Diana IF she had been born into the Royal Family. Since she got there by way of her marriage to Chuck...and then divorced him...she got stuck with the "lesser" title above. Had she stayed married to Prince C...she would have been known as HRH (Her Royal Highness) The Princess of Wales. In the divorce, she lost the HRH part. No biggie in my opinion...she got to keep the princess part which is the best part.
Anyway, there I go off on a tangent again. But you learned something, didn't you? My friend Becca was kind enough to supply me with this recipe. I did tweak the recipe a bit (I used cold butter instead of room temp, and I used apricots instead of raisins). Becca is an AMAZING cook. Here is a link to her blog...it's well worth more than just a glancing look!
1 stick (1/2 cup) unsalted butter, cold, and cut into small pieces
1 egg, beaten
3/4 - 1 1/4 cups milk
1 cup raisins (optional) - OR ANY CHOPPED DRIED FRUIT(like apricots, cranberries, cherries, peaches, prunes, mangos, etc)
1 beaten egg yolk for glazing
Directions:
Preheat oven to 350 degrees (175 C)
Combine flour, sugar, and baking powder in large bowl. Whisk until well blended.
Cut in the cold butter and mix until flour resembles bread crumbs. I use a pastry cutter...but you can use a fork.
Cut up dried fruit of choice into raisin-size pieces.
Make a well in the center of the flour/butter mixture and add the beaten egg and about 3/4 cup milk. If adding fruit, add it now.
Bring the mixture together with a wooden spoon, making sure you don't overmix (this will toughen the dough). If the mixture seems dry, add milk (1-2 Tablespoons at a time). You want a lightly bound, sticky dough.
Lightly dust a cutting board and your hands with flour and dump dough onto floured surface. Form into sort of a ball and press out to about 1 inch (or so) thick.
Using a 2-inch round cookie or biscuit cutter (I used my grandmother's), cut out about 18-24 scones--using leftover dough to form new scones until all dough is used.
Place scones on ungreased baking sheet (I used a silicon sheet) about 1 inch apart.
Brush tops of scones with the beaten egg yolk.
Bake for 15-20 minutes until scones are LIGHTLY colored.
Serve immediately while hot, OR, transfer to wire rack and let cool completely.
Store in airtight container at room temperature.
The final sweet treat is cupcakes. I decided early on that I wanted to incorporate some flavor/variety of tea into at least one of my offerings. I toyed with Earl Grey or Chamomile but ultimately landed on Chai. I love Chai. I drink it almost every day. Chai, for those of you not in the know, is sort of India's version of coffee. Traditional chai is served hot, frothy, and milky. It's HEAVILY flavored with green cardamom. The cardamom gives it a very floral fragrance. I prefer the "spiced" version (called Masala Chai) with lots of added cinnamon, ginger, allspice, cloves, and black pepper. I'm telling ya, it's a hug in a cup.
Speaking of cups...I found these absolutely ADORABLE silicone teacup baking cups online and HAD to get them for this party. H A D T O. They are even translucent and look just like fine china. Aren't they C-U-T-E??
I decided to top these beauties off with an equally-decadent frosting. I couldn't decide between a buttercream and cream cheese frosting...so I thought "why not both?" and combined the two to make an uber-rich-and-delicious cream cheese buttercream frosting...with real vanilla bean. OMG. It was so good.
Spiced Chai Cupcakes
with
Vanilla Bean Cream Cheese Buttercream Frosting
Cupcake Ingredients:
1 to 2 Tablespoons ground cinnamon
1/2 to 1 teaspoon ground ginger
1/2 to 1 teaspoon ground cardamom
1/2 to 1 teaspoon allspice
1/2 to 1 teaspoon, ground cloves
1/2 to 1 teaspoon, black pepper
1 box white or yellow cake mix
1/2 cup oil
3 eggs
1 cup water
Cupcake Directions:
Preheat oven to 350 degrees (175C).
In large bowl, mix cake mix and spices. If you like a LOT of spice, add 1 tsp of each of the spices and 2 TBS cinnamon. I added the larger amounts. Whisk until well blended.
Add eggs, oil, and water. Mix until well blended.
Pour into paper baking cup-lined muffin tin--filling each cup to 3/4 full.
Bake for 15-20 minutes until toothpick comes out clean.
Remove from tin and cool completely on wire rack before frosting.
Frosting Ingredients:
8 oz. cream cheese (or Neufchatel) softened at room temperature
2 sticks (1 cup) butter (I use salted butter) softened at room temperature
4 cups powdered sugar
2 tsp vanilla
1 vanilla bean split in half, seeds scraped out.
Frosting Directions:
Note: Use a stand mixer or hand mixer (which I used).
Mix together butter and cream cheese until well blended, fluffy, and without lumps.
Add powdered sugar, 1 cup at a time, and mix until incorporated.
Add vanilla and scraped vanilla seeds and mix until well blended. See the video below for how to scrape a vanilla bean!
Place frosting in ziplock bag. Snip off corner of bag and use it as a piping bag to pipe frosting onto cupcakes starting at outer edge and swirling in toward middle--this is MUCH easier than spreading on the frosting and it looks prettier!
Store cupcakes in airtight container in refrigerator for up to a week.
That's it for today! Stay tuned for the FINAL installment of the High Tea--Texas Style series...The Guests!
Thank you, as always, for venturing out to Left Field--where the grass is ALWAYS greener.
I tell ya, this Tea Party series seems like it's never gonna end, doesn't it? I assure you, it will. I think there will be just one more post after this one. Maybe 2, depending on how much I squeeze into this post.
For those of you who are just joining this Conga line, here are links to the first 7 parts.
Today's post is mainly about the baked goods. As you may have noticed so far, I haven't exactly made anything that is diet-friendly. I realized that, and in my defense, I did substitute non-fat Greek yogurt for sour cream, and Neufchatel for cream cheese in several recipes. But, I decided to make at least ONE offering that was TOTALLY non-fat, dairy-free, with no added sugar. THREE, if you count the tea and mixed nuts.
Rainbow Fruit Kebabs. I made one as an example, and dear Jonathan assembled the rest of them. Each skewer has a red grape, 2 blueberries, green grape, pineapple, cantaloupe, and a strawberry on top. They're very artistic--all rainbowy and what not.
Rainbow Fruit Kebabs
Ok, enough of the healthy stuff...let's move on to the baked goods. We served 4 different baked confections (well 5, if you count the lemon tarts). I'll start things off with the "easiest"...Brownie Bark.
It goes by many different names--Brownie Brittle, Brownie Crisps, Brownie Chips, Brownie Snaps, Brownie Crunchies... I chose to call mine "Brownie Bark", but I think "Brownie Crack" would have been more appropriate because this stuff is so ADDICTIVE.
Whatever you call it, it's yummy, crispy, crunchy, chocolaty confectionary goodness. I think Willy Wonka probably fed this to the Oompa Loompas. There is a commercial version of these available in stores called "Brownie Brittle" by Sheila G. and you can visit her website HERE. Mom and I discovered her version and man-o-man is it good. I think we ate 10 bags of it.
What?
They are VERY small bags.
Anyway, here is my version of this tasty treat.
Brownie Crack, er, um... Bark
Ingredients:
Your favorite boxed brownie mix (which will probably take oil, eggs, and water)
1 cup mini semi-sweet chocolate chips
Directions:
Preheat oven to 325 degrees F (160 C)
Mix up brownie batter--according to its package directions
Pour about a third to half the batter onto either a silicone baking mat in a cookie sheet or one that has been lined with parchment paper. I used my silicone baking mat.
With an offset spatula or butter knife, spread the batter out THIN...like to a thinness of 1/8-1/4 of an inch (~1/2 cm) thick. It needs to be UNIFORM thickness to its edges. Try to fill the bottom of your cookie sheet as much as you can.
Sprinkle chocolate chips all over surface.
Bake for about 20-25 minutes or until it's completely done all the way through. It may seem burnt along the edges...that's ok.
Remove from oven and immediately cut into squares with a pizza cutter or knife...though the pizza cutter is MUCH easier.
Move cut pieces, immediately, to wire rack to cool.
Store in airtight container once they're completely cooled. They'll hold a week or more when stored properly.
The next sweet sensation in the lineup is my Pecan Shortbread. I've posted my recipe on this blog before (though it's been a couple of years). This is, hands down, the best Pecan Shortbread you will EVER eat. I promise. It's the holy grail of shortbread cookies.
It's...Nirvana.
Torrey's World Famous Pecan Shortbread
Yield: a ton (3-4 dozen depending on diameter of dough log) Ingredients:
3/4 lb. (3 sticks) regular, salted butter, at room temperature
1 cup sugar
1 tsp vanilla extract
3 1/2 cups all-purpose flour
1/2 tsp salt
2 cups chopped pecans (reserve 1/2 cup for dipping)
half of a 12-oz bag semi-sweet chocolate chips (for dipping)
1 tsp vegetable shortening (Crisco)
OPTIONAL/ALTERNATIVE:
1/2 cup sliced almonds
1/2 cup crushed toffee candy (like Heath bars)
Directions:
Cream together sugar and butter--until light and fluffy.
Add vanilla and stir into butter/sugar mixture.
In separate bowl, whisk flour and salt together.
Add flour/salt mix to butter/sugar mix, a little at a time.
Add 1 1/2 cups chopped pecans (I chopped them by hand) to dough and THOROUGHLY incorporate them.
The dough can either be very stiff or very crumbly and you won't think it will hold together...but it will when you press it with your hands. Trust me.
Place reserved 1/2 cup of pecans in separate bowl and set aside.
Divide dough into 4 equal pieces.
By hand, form each piece into a log (about 2 inches in diameter). Wrap each log, snugly, with plastic wrap and chill in refrigerator for at least 1 hour.
Preheat oven to 350 F (175 C).
Remove plastic wrap from dough log and slice into 3/8-inch - 1/2-inch thick slices.
Place sliced dough onto UNGREASED parchment paper-lined cookie sheet (or foil-lined, or silicone mat-lined) about 1/2 inch apart...they don't spread.
Bake for 15-20 minutes until edges are golden brown and center is cooked but NOT browned (see photo above).
After baking, gently transfer to cooling rack (they're very fragile at this stage), and cool completely. Once cooled, they're sturdy.
You can leave them plain, OR...dip them in chocolate.
For CHOCOLATE DIPPING:
Spread reserved, chopped pecans onto cookie sheet and return to oven for 5-10 min. until toasted. Watch them carefully so they don't burn. Then, place them back in a bowl.
In microwave-safe bowl, melt chocolate chips.
Stir in shortening.
Coat cooled cookies 1/2-way with melted chocolate (front, back, and sides)--scraping off excess.
Immediately roll chocolate-dipped cookies in toasted pecan pieces. Alternately, you can use sliced almonds, or crushed toffee pieces (or leave them plain chocolate if you like) and return cookies to cooling rack.
Chill chocolate-dipped cookies for 20-30 min. in fridge to set chocolate.
Store in tightly-sealed container (if you have any left).
Ok...this post is long enough, so I'll conclude the baked goods in the next post. Tune in for Apricot Scones and Spiced Chai Cupcakes with Vanilla Bean Cream Cheese Buttercream Frosting. Thanks, as always, for trodding out here to Left Field...where the grass is ALWAYS greener.
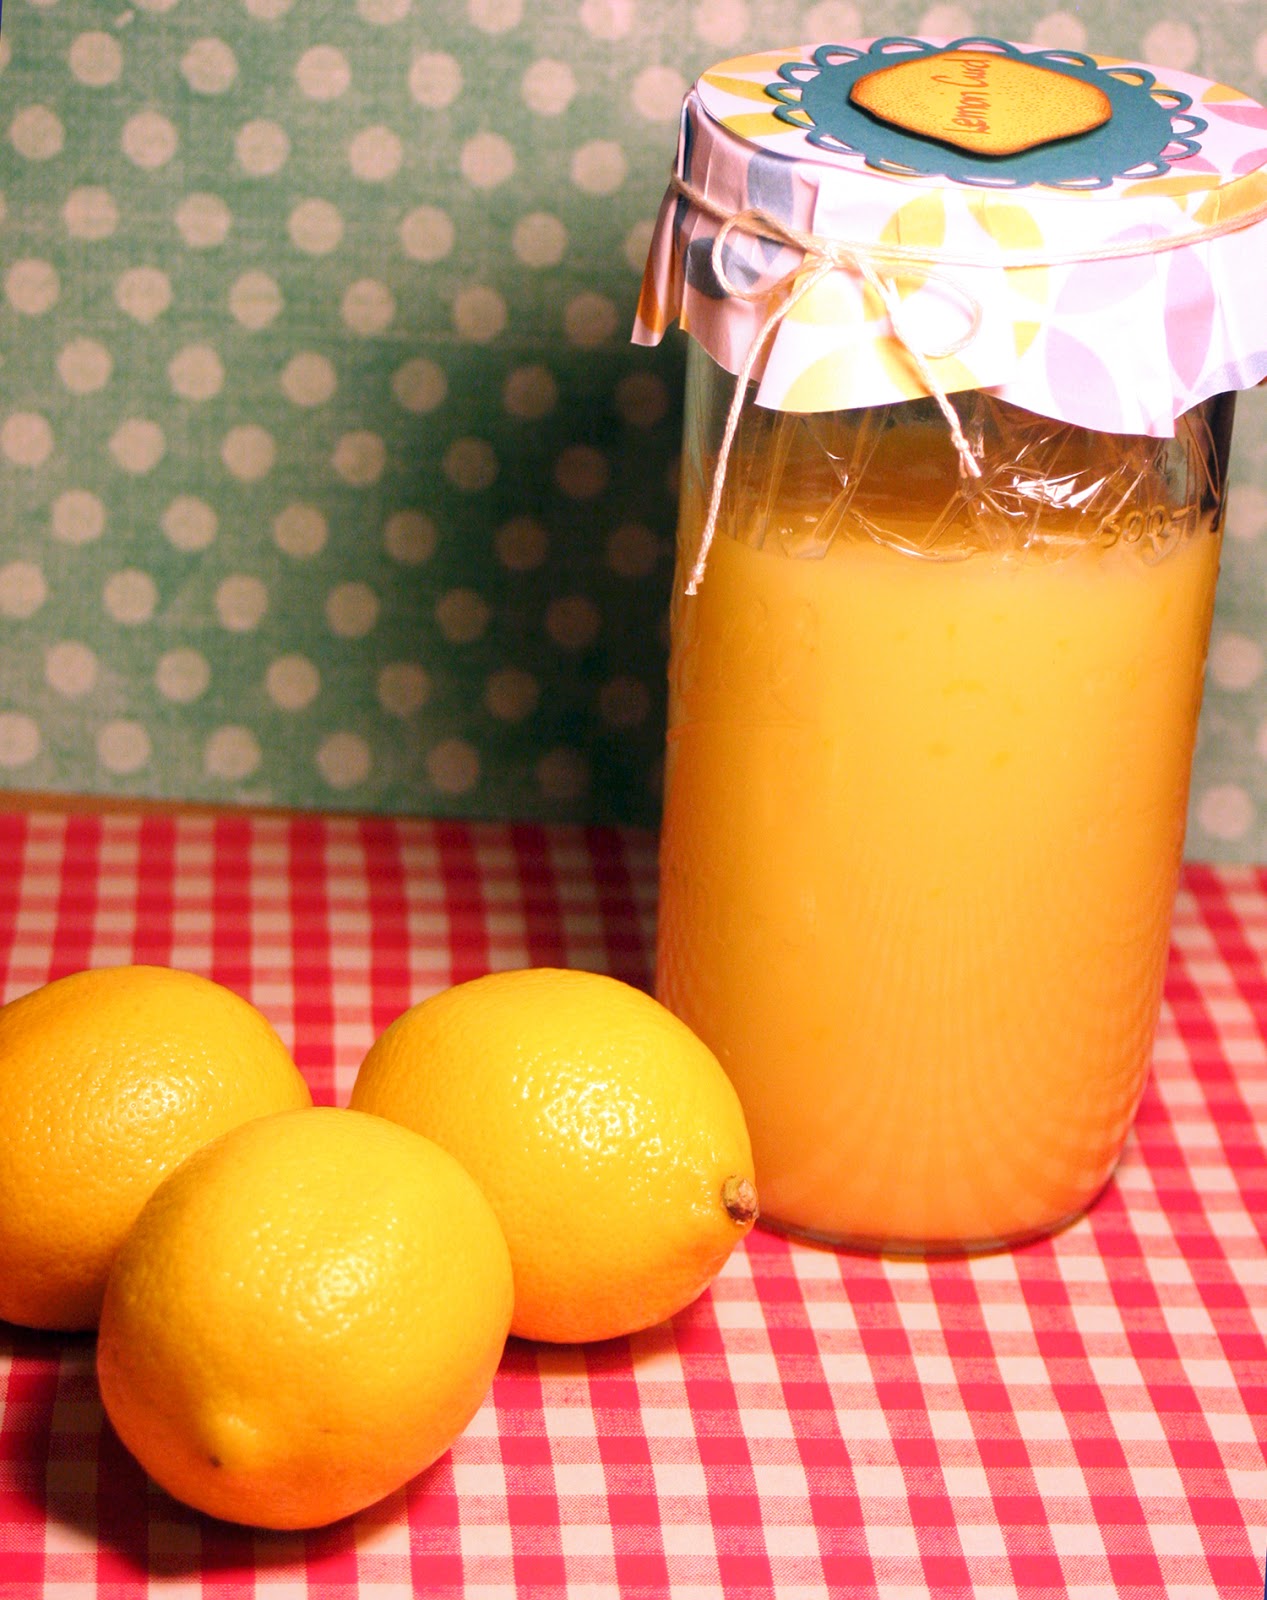
Today, we continue on the Sugar Express with LEMON CURD (and, their partner in crime--Lemon Tarts). For those of you who have never heard of Lemon Curd...I'm sorry. Truly I am. You've missed out on something...amazing. Lemon curd is WONDERFUL (when it's done right).
It's a velvety, tangy, bright, lemony, rich concoction that is suited for LOTS of things!
scrumptious filling for tarts or thumbprint cookies
as a delicious spread for...well...just about anything like cake, toast, croissants, scones, biscuits, muffins, pancakes, waffles, gingerbread, French toast, crepes, cookies, roofing shingles, patio tiles, Frisbees...anything!
mix it with whipped cream and freeze it for an AWESOME summery dessert!
as a topping for fresh berries!
as a topping for ice cream!
mix it in your favorite cheesecake recipe for a Lemon cheesecake that is to die for!
layer it with prepared pudding for a pretty parfait or trifle!
Put a dollop or 3 on yogurt for a breakfast treat!
As you can see, it's VERY versatile. Even though it's yummy...to buy (good) lemon curd is EXPENSIVE. I've seen little 8 oz. jars of the stuff go for $10-$25 in fancy epicurean/culinary stores. And prepared (aka "canned") lemon curd is nowhere NEAR as good as fresh, homemade lemon curd. Homemade lemon curd costs less than $2 to make about 16 oz of it.
But, lemon curd has a nasty reputation when it comes to making it. It tends to be... temperamental (heavy on the MENTAL part). And, like its cousin Hollandaise Sauce, it can turn on you in an instant and end up a HOT MESS if you don't know the secret.
Trust me, there is a secret...
to making PERFECT Lemon Curd.
Every.
Time.
Guess what? I know the secret, and I'm gonna share it with you.
Traditional methods of making lemon curd call for combining everything BUT the eggs...then slowly adding the eggs as it cooks. This pretty much guarantees that your curd will seize up-- and you will get bits of cooked egg in your curd requiring you to have to (painstakingly) strain it through a sieve at the end. But my FOOLPROOF method takes care of that annoyance once and for good.
The science behind the secret has to do with the egg proteins getting little coats of armor from the butterfat. This bullet-proof fat vest protects the proteins from the effects of the acid in the juice...which normally makes the protein molecules agglutinate (clump up). So, now you know. (I totally just felt like Alton Brown).
You can completely ELIMINATE this agglutination, altogether, simply by combining the ingredients in a different order. Follow my steps below, and you will get perfect results, every time.
Foolproof Lemon Curd
Ingredients: for ~ 16 oz.
2/3 cup fresh lemon juice (~4-5 small lemons)
6 Tablespoons unsalted butter, softened
1 cup sugar
2 eggs
2 egg yolks
1 teaspoon lemon zest
Directions:
Cream together sugar and butter until light and fluffy (just like you do when you're making cookies). Use a mixer, it makes life easier.
Add eggs, ONE AT A TIME, mixing well after each addition.
Add yolks, ONE AT A TIME, mixing well after each addition.
Remove zest from lemons, chop zest finely, and set aside.
Juice lemons and strain juice.
Add strained lemon juice to butter/sugar/egg mixture and mix well. At this point it WILL curdle and look disgusting (see image below). But fear not! As soon as it heats up a bit, it completely smooths out...MAGICALLY! (Remember our little bullet-proof butterfat vests?)
Transfer to heavy saucepan and cook, over LOW HEAT, until it does its magic smooth-out thing. Make sure you keep stirring it until it's all smoothed out. See? I told you it magically smooths out! Look how velvety it is!
After it becomes smooth, increase heat to MEDIUM. Using a heat-proof silicone spatula...CONSTANTLY STIR IT while it's cooking--paying close attention to the corners and bottom of pan. KEEP IT MOVING. This is IMPORTANT. If you fail to stir it, you'll get overcooked parts that will cause lumps.
As it cooks, it will thicken. DO NOT let it boil. Repeat after me: "Keep it moving. Don't let it boil. Keep it moving. Don't let it boil. Keep it moving. Don't let it boil".
It's ready when you drag your finger down the back of the spatula and it leaves a solid trail. The cooking takes about 10-15 minutes.
It will continue to thicken as it cools.
Add chopped lemon zest NOW. Stir it in.
Pour hot lemon curd into clean, heat-proof jars and let sit for a few minutes (like 10) to cool a bit
Cover surface with plastic wrap (so it's touching the surface)...this will prevent a skin from forming.
Put the jar lid on, tightly, and pop it in the refrigerator.
It will keep, in your fridge, for about a week or so (yeah, like it will last that long).
Some people say you can freeze it for up to 2 months...but I haven't tried that, so if you do freeze it, you do so at your own risk. Let me know how it fares. I suspect that it will mess up the texture...but ya never know!
Okee dokee...now for the Lemon Tarts. These tarts are absolutely divine! They have a shortbread crust that only takes 3 ingredients to make. The crust is a wonderful shortbread cookie on its own, by the way.
Torrey's Lemon Tartlets
Ingredients:
For Crust:
1 cup (2 sticks) butter, softened
1/2 cup powdered sugar
2 cups flour
extra powdered sugar for garnish
For filling:
Lemon curd
fresh mint leaves (optional for garnish)
Directions:
Preheat oven to 350 (175 C)
In bowl, cream together butter and powdered sugar.
Add flour, a half cup at a time, and mix until it forms a soft dough. Note: dough will probably be crumbly at first, but keep mixing it and it will come together.
Form dough into ball with your hands, then roll it out onto surface that is dusted with POWDERED SUGAR to a thickness of about 1/8 inch thick...a little less if you're brave.
Use large flower cookie cutter to cut out dough.
Press dough flowers into mini tart pan (or mini muffin pan) as shown.
Bake for 15-18 minutes until lightly brown around edges.
Remove from pan and cool on wire rack
Place lemon curd in ziplock bag, cut off corner of bag, and pipe lemon curd into each cooled crust.
Dust tarts with powdered sugar and (if desired) garnish with fresh mint leaf.
Thanks, again, for playing in the kitchen with me! Stay tuned tomorrow for more Tea Party SWEET STUFF! Tomorrow I'll feature Pecan Shortbread, Spiced Chai cupcakes, Brownie Bark, and Apricot Scones!
We're nearing the end of our TEA-rrific journey. Today starts what is probably the MOST-anticipated part of the Tea Party coverage...The Sweets.
Savory foods have their place...but the headliner is ALWAYS the sweet stuff. If you're just now joining me on this tea-laden adventure, you've missed out on the first 5 chapters! Here are links to all of them so you can get caught up.
Without further filibustering, I bring you...SUGAR (and its partner in crime, cream cheese).
The first character in our sacchariferous lineup (how's that for a $20 word?) is all thanks to my BFF, Jodi. I wanted to serve those fancy butter mints alongside the salted nuts, and then it came to me...JODI'S WEDDING MINTS. Jodi has been making THE MOST AWESOME wedding mints for as long as I've known her. So, I called her up and asked her for the recipe. I was SHOCKED at how simple it is. I mean REALLY simple. OH MY, are they SOooooooooo delicious!Before I move on to the recipe, I have to tell you a hilarious story about one particular batch of these delectable morsels.
Jodi had made like 400 mints for a wedding and they were spread out on cookie sheets all over her kitchen to dry. She left the house for awhile and when she returned...the mints were GONE.
ALL 400 of them.
GONE. Turns out, her dog (Dakota--a VERY smart, and as a result, very sickBorder Collie) thought they were yummy too. He had eaten the mints, right off the cookie sheets...and left the cookie sheets on the counter. He devoured them ALL. Let's just say, I'm glad I didn't have to clean up after that dog...if you know what I mean. That also reminds me that Dakota also once ate half a Pineapple Upside Down Cake and a whole package of donuts that had been in their plastic "clamshell" bakery box...which he somehow opened and left, unmangled, on the counter. Smart dog. Smart dog with a sweet tooth. So, here are those infamous mints--considered absolutely yummy by both humans and, apparently, dogs.
Jodi's Infamous Cream Cheese Wedding Mints
(I shortened the name so it would fit on the placard)
Ingredients: (for 150 mints)
4 oz (1/2 package) cream cheese, softened
4 cups powdered sugar
5-10 drops Flavoring....IF DESIRED. I used pure Peppermint oil (don't use cheapy extract--it will ruin the consistency of the dough)
Food coloring (paste type) if desired--I didn't use any
1/2 cup of sugar (in separate bowl)
Candy moulds --the flexible silicon/rubber kind--you want small, simple form shapes (about 1-inch big). Stars, hearts, roses, leaves...those work well.
Directions:
First off...notice the ratio of powdered sugar to cream cheese is ALWAYS 1 cup to 1 oz. Makes it easy to increase your amount.
In bowl, mix cream cheese until light and fluffy.
Add flavoring and food coloring now. Mix thoroughly. NOTE: you want to use high-quality flavorings...the concentrated stuff. I used Peppermint oil that I bought at my health food store in their "essential oils" section.
Add powdered sugar, 1 cup at a time, mixing after each addition. This will form a VERY stiff dough. I did this by hand and it wasn't too bad. It doesn't seem like it will be enough for 150 mints...but it totally is.
Pinch off tiny bit of dough and roll into SMALL ball (I mean SMALL...like penny/nickel size)
Roll dough ball in sugar (this will allow it to release from mould)
Press sugar-coated dough ball into mould...make sure it JUST fills the mould
Turn mould over and and gently pop out mints onto parchment paper-lined cookie sheet.
Allow mints to THOROUGHLY dry for 2-3 days (flipping them over after a day or so)
Once dry, mints will store BEAUTIFULLY in an airtight container (or ziplock bag) in the freezer
Even when dry, these mints stay SOFT! Oh my they're good.
Thank you, as always, for finding your way out to Left Field. Tune in tomorrow as I continue the sweet stuff with...."Lemon Curd". You won't want to miss it!